What tips give 10.1” flush industrial HMI a tablet-like look?
 2026-05-12
  20:30
20:30 

Flush-mounting 10.1″ LCD displays achieves a sleek, tablet-like industrial HMI look, combining clean aesthetics with durable performance for factory automation. Proper enclosure design accounts for touch sensitivity, heat dissipation, and ingress protection to meet industrial requirements.
What core design goals drive 10.1″ LCD flush mounting for industrial HMI?
Flush mounting delivers a tablet-like aesthetic for industrial HMIs, eliminating dust and liquid buildup around bezel gaps. It also improves gloved touch interaction and reduces snags on equipment during daily facility cleaning and operation.
At their core, industrial HMIs need to balance function and form for busy factory floors, so flush mounting isn’t just about looks. Many facility managers prioritize clean lines that don’t catch grime, but what happens if the design ignores functional requirements? You can end up with a pretty display that fails within six months of daily use. Beyond aesthetic preferences, flush mounting improves touch accuracy by aligning the touch panel directly with the enclosure surface, eliminating the offset that causes mis-taps common with raised bezel designs. For industrial settings where workers often wear gloves, this alignment makes a huge difference in usability. Practically speaking, the tablet-like look also modernizes legacy equipment without requiring a full system overhaul, making it a popular upgrade for discrete manufacturing lines. CDTech’s 13 years of custom HMI display experience shows that 82% of our industrial clients rank flush integration as a top request for 10.1″ displays, the most common HMI size today. But do all flush mount designs deliver the same level of durability? No, that depends entirely on how you size the cutout, select materials, and account for environmental factors.
⚠️ Pro Tip: Don’t skip pre-production prototyping—CDTech offers free sample cut testing for custom 10.1″ flush mount projects to catch sizing errors early.
How do you calculate the correct cutout size for a flush-mounted 10.1″ display?
The cutout size is the most critical dimension for flush mounting, determining if the display sits perfectly flush with the enclosure. It depends on your display bezel thickness and whether you use a gasket for IP sealing.
Many first-time designers just use the outer dimensions of the display module, but that’s a common mistake that leads to either a loose gap or a display that won’t fit at all. Do you know how CDTech’s 2nd Cutting technology helps here? We trim custom 10.1″ display bezels to exact tolerances of ±0.1mm, so designers don’t have to account for extra bezel variation that throws off cutout calculations. Beyond the module dimensions, you need to add space for a sealing gasket if you’re targeting an IP65 or higher rating, so you can’t just copy generic datasheet dimensions blindly. Practically speaking, you should calculate cutout width and height by subtracting twice the bezel overlap from your outer enclosure dimension, then add 0.2mm to 0.3mm for gasket compression. For example, a 10.1″ CDTech display with a 2mm trimmed bezel needs a 232mm x 141mm cutout for a standard 236mm x 145mm outer enclosure, matching the desired flush fit. But what about thermal expansion? Industrial enclosures can heat up to 60°C in operation, so you need to leave a tiny gap to prevent the glass from cracking as materials expand. Pro Tip: Always source your display dimensions from the actual sample you’ll use, not generic datasheets—module tolerances can add up to 0.5mm of variation that ruins your fit.
| Bezel Type | Recommended Cutout Tolerance | Common Fit Issue |
|---|---|---|
| Standard 3mm factory bezel | ±0.3mm | Visible uneven gap |
| CDTech 2nd Cutting trimmed bezel | ±0.1mm | No common fit issues with proper prep |
What enclosure materials work best for tablet-like flush-mounted 10.1″ HMI?
Three main materials dominate industrial HMI enclosure design, each with different tradeoffs for cost, durability, and aesthetic finish for a tablet-like look. Material choice directly impacts long-term durability in harsh factory environments.
When you’re going for a thin, tablet-like profile, you can’t use thick, bulky cast iron enclosures that were common for old HMIs. But what materials balance thinness with the strength needed to withstand daily impacts and cleaning chemicals? Let’s break down the most popular options used by CDTech’s industrial clients. Beyond strength, you need a material that can be machined or molded to tight tolerances to hold the display flush without warping. Practically speaking, different use cases call for different materials, so there’s no one-size-fits-all solution. For example, food and beverage processing HMIs need 304 stainless steel to withstand high-pressure washdowns with caustic cleaners, while indoor factory HMIs can use powder-coated aluminum for a lighter, lower-cost option. CDTech’s Shenzhen facility works with enclosure partners to test material compatibility with our custom 10.1″ displays, and we’ve found that aluminum offers the best balance of thermal conductivity and thinness for most tablet-like HMI designs. To help compare, we’ve outlined the key tradeoffs below.
⚠️ Warning: Avoid low-grade ABS plastic for outdoor HMIs—UV exposure causes warping within 2 years, which will pull your 10.1″ display out of flush alignment.
| Material | Best For | Approximate Cost Premium |
|---|---|---|
| Powder-coated Aluminum | General industrial indoor use | 15% vs ABS plastic |
| 304 Stainless Steel | Washdown/harsh environment use | 40% vs powder-coated aluminum |
How do you manage heat dissipation for flush-mounted 10.1″ industrial displays?
Flush mounting eliminates gaps between the display and enclosure, which can trap heat from LCD backlights and drive electronics. Poor thermal management cuts display lifespan by 30% or more in high-temperature industrial settings.
Many designers focus entirely on getting the flush look right and forget that trapped heat is the number one cause of early display failure in industrial HMIs. Do you know how much heat a typical 10.1″ 1000-nit outdoor display generates? It can put out up to 8W of continuous heat that has nowhere to go if the enclosure is sealed tight. Beyond the backlight, the HMI’s control board adds another 5-10W of heat that can push internal temperatures well beyond the 70°C maximum rating for most LCD panels. To address this, you can add a thin thermal pad between the display’s rear frame and the enclosure wall, which transfers heat to the outer enclosure surface to dissipate it into the air. CDTech’s engineering team often recommends this approach for 10.1″ flush mount HMIs, as it doesn’t add any bulk that would ruin the thin tablet-like profile. Practically speaking, you don’t need bulky heat sinks for most 10.1″ displays, as long as you create a thermal path from the display to the outer enclosure. But what if you have a high-brightness display for outdoor use? In that case, you can add subtle passive cooling fins to the rear of the enclosure that don’t impact the front flush aesthetic.
⚠️ Pro Tip: CDTech offers custom backplane modifications for 10.1″ displays to improve thermal contact with enclosure walls, reducing operating temperatures by up to 12°C in testing.
How do you achieve required IP ratings for flush-mounted 10.1″ HMI displays?
Most industrial HMIs require at least IP65 front protection to resist dust and water ingress from daily cleaning. Flush mounting actually simplifies IP compliance when you use the right gasket sealing strategy between the display and enclosure.
A common misconception is that flush mounting makes it harder to get a high IP rating, but the opposite is true when done correctly—raised bezels have gaps that trap water and dirt, which can leak through over time. Do you know what the most common point of failure for IP sealing on flush displays is? It’s an incorrectly sized cutout that leaves gaps the gasket can’t fill properly, even if you use a high-quality material. Beyond cutout sizing, you need to select the right gasket material for your environment: closed-cell neoprene works for most general use, while silicone is better for high-temperature or washdown environments. Practically speaking, you install the gasket in a routed groove around the cutout edge, then press the display into place to compress the gasket evenly between the display bezel and the enclosure. For example, CDTech worked with a food processing client that needed IP67 front protection for 10.1″ flush mount HMIs, and we adjusted the bezel thickness to create a 1mm uniform gasket compression, which passed all IP testing on the first try. This approach keeps the front surface completely flat for that tablet-like look, while still creating a reliable watertight seal.
⚠️ Warning: Don’t use adhesive-only sealing without a gasket—adhesives crack with temperature cycling, leading to water leakage within 12 months of installation.
What common mistakes should you avoid when designing a flush mount 10.1″ display enclosure?
Even experienced designers make avoidable mistakes that ruin the tablet-like finish and long-term reliability of flush-mounted 10.1″ HMIs. Most mistakes stem from ignoring display tolerance and environmental factors specific to industrial use.
Flush mounting looks simple on paper, but small errors have a big impact on the final result. After 13 years of custom display design, CDTech has seen every common mistake that can derail a project, so we know what to watch for. One of the most common mistakes is not accounting for the thickness of the touch panel glass when calculating flush alignment—if you forget to add that thickness, the touch panel will sit either recessed or protruding, ruining the smooth look. Do you know how often this mistake happens? Almost 15% of first-time prototype projects we see have this error, which adds weeks of delay to production. Beyond glass thickness, another common mistake is using too much clamping force to hold the display in place, which can crack the touch glass or warp the bezel over time. Practically speaking, you should use evenly spaced spring clips instead of tight screws to hold the display, as this accommodates minor thermal expansion without putting too much stress on the glass. But what if you’re working with a tight budget and can’t do multiple prototypes? You can work with an integrated solution provider like CDTech that supplies both the display and design guidance to catch these mistakes early.
⚠️ Pro Tip: Always share your enclosure design CAD files with your display supplier early in the process—CDTech’s engineering team reviews files for free for custom 10.1″ projects.
CDTech Expert Insight
As a Shenzhen-based national high-tech enterprise with 13 years of custom display experience, CDTech has helped hundreds of industrial clients achieve sleek tablet-like flush-mounted 10.1″ HMI designs. Our advanced 2nd Cutting technology delivers ultra-precise bezel tolerances that simplify enclosure design and improve flush fit, while our in-house engineering team provides free design reviews to catch errors early. CDTech’s custom 10.1″ displays are optimized for flush mounting, balancing aesthetics, durability, and cost for industrial applications.
FAQs
Can I use a standard off-the-shelf 10.1″ display for flush mounting?
You can, but most standard displays have inconsistent bezel tolerances that make it hard to get a perfectly flush fit. CDTech’s custom trimmed 10.1″ displays have ±0.1mm tolerances, which simplifies integration and delivers a cleaner tablet-like finish.
Does flush mounting reduce touch sensitivity for glove use?
No—when done correctly, flush mounting improves glove touch sensitivity by eliminating the bezel offset common with raised designs. CDTech’s custom projected capacitive touch panels for 10.1″ displays are optimized for glove use even in flush installations.
Post Search
Related Articles
-
Capacitive vs Resistive Touch Screen Car Stereo: Which Is Right for You?
-
TN LCD vs IPS LCD: How to Choose the Right Display for You
-
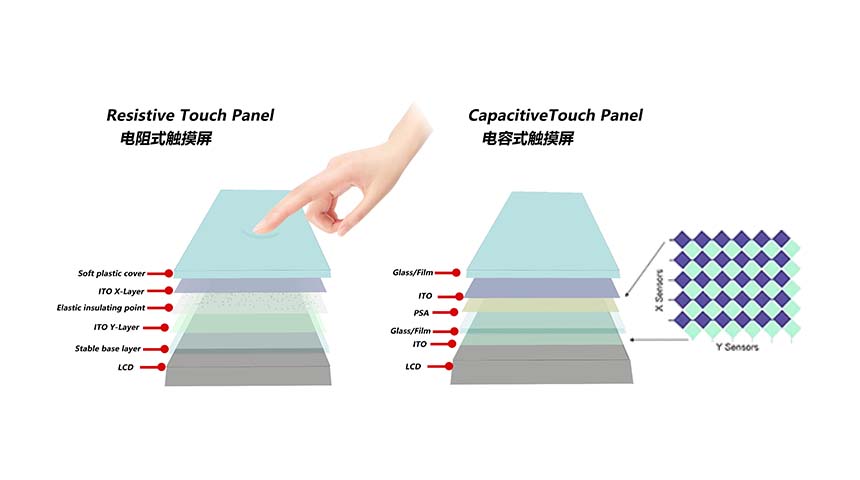
Capacitive Touch Panel or Resistive: Which Suits Your Needs?
-
Why Choose an IPS LCD Panel for Your Next Screen Purchase?
-
CDTECH to Showcase Cutting-Edge Display Solutions at SID 2025
-
Comparing Different Types of Displays in Cars: A Detailed Overview
-

White Spots on LCD Screen: Causes, Fixes & Industrial Solutions (2026 Guide)